
Just Keep Fishing Skill Tree Ranked S to C
Backpack, bobber stack, and extra rods first — then range, magnets, value, and the nodes that are just jokes.
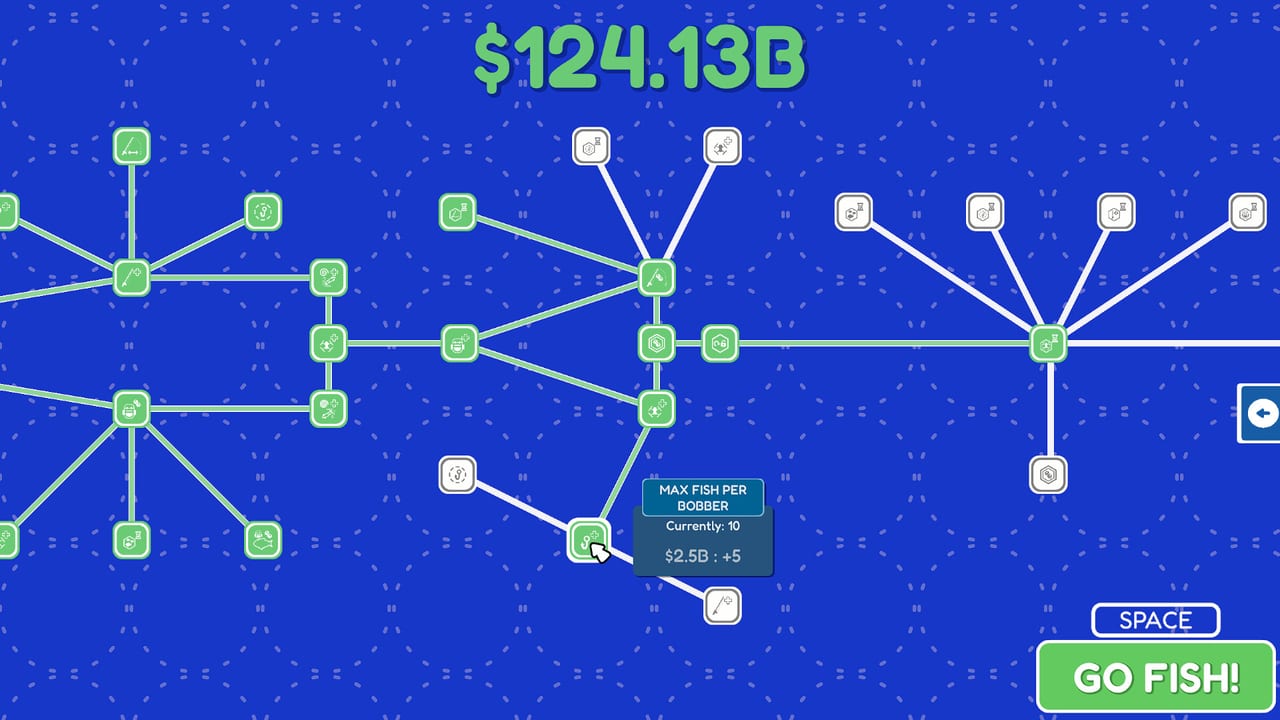
The Just Keep Fishing skill tree is the whole game after you sell the first barrel. You walk into a blue node map, spend dollars, then press Space or click GO FISH! to drop back onto the island for another day. Node prices scale until a late screenshot still shows Max Fish Per Bobber at 10, with the next rank costing $2.5B for +5 while the wallet reads $124.13B. That curve is why this list ranks roles, not the sticker on one node.
A full backpack earns nothing. A bobber that can only hold one fish wastes every extra rod. Sell-value nodes on an empty pack are decoration. This page sits under the Tier List Hub next to the Fish Tier List: upgrades decide whether commons, gold fish, and 2X water can actually print. For a click order you can tick off, use the upgrade planner. For first-day muscle memory, use Getting Started and the controls.
How to read this list
S-tier nodes ungate the loop. A-tier nodes make a full pack faster or richer. B-tier nodes are comfort and passive catch. C-tier nodes are jokes, late dumps, and zoom. Yellow delivery crates sit in a special note because reviewers call them overpowered once they land — use them, then reset your expectations on New Game Plus instead of rewriting S-tier around a crate streak.
Buy in the order the island forces you to feel pain: cannot hold → cannot hook enough → cannot reach the school → cannot sell fast enough. The walkthrough says when a new island opens; this list says which branch to click when you get there. After patches, skim launch notes before you trust an old $2.5B tooltip.
S — Backpack size
You cannot earn if you are full. That sentence is the entire S rank. The run starts with a tiny pack (demo players go 2 → 5 on the first node). Later screenshots show 12/40 on a tropical island, 0/137 with a fan of lines, 0/175 on lava, 66/350 on reef docks, and 30/950 in the $34T late haul. Every one of those fractions is the same job: if the numerator hits the denominator, you stop converting water into dollars.
When the pack chokes, buy backpack before lure, before fish-value, before a prettier branch. The how to make money fast loop is “fill, sell, buy capacity, repeat.” A gold fish or a squid in a full pack is a wasted animation. If you only remember one node from this page, remember this one.
S — Max fish per bobber
Each cast is a bucket. Raising max fish per bobber turns one throw into a stack, which is why stacked pond fish beat a lonely squid on the fish list. The launch tree still lists the node at Currently: 10 with $2.5B : +5 at a $124.13B wallet. That tooltip is the exponential-cost lesson: the role stays S even when the price looks insane, because every extra fish on the hook multiplies every rod you already own.
Buy this whenever casts come up half-empty in a dense school. Do not buy it to “afford a squid.” Squid are a B role. Bobber stack is how commons stay S. Combine it with extra rods and the tropical island screenshot (four lines, pack 12/40) starts to look like a machine instead of a hobby.
S — Extra rods and lines
One line is a tutorial. Four lines (the tropical island with four ! bobbers) is the game. Later shores throw out a fan of ten-plus casts at $251.31K with yellow crates already on the grass. Extra rods copy every other S node: each new line inherits your lure radius, your bobber stack, and your magnets.
Buy rods when you can already fill one line and still have school left. Buying a seventh rod with a two-slot backpack is how you catch two fish and watch the rest despawn. Capacity first, then lines, then the A-tier range nodes that let those lines actually land in 2X water.
A — Lure / attraction range
The dotted ring around a bobber is the real aiming reticle. Lure range decides whether gold fish, clownfish, and 2X reef schools are in the bucket or one step outside it. Casts that miss by a body-length are a range problem, not a “wrong fish” problem.
Take lure nodes when you are already filling the pack on easy schools and want the next ring to cover a denser patch. They are A, not S, because a huge ring on a tiny backpack still dumps you at the barrel after two fish. Pair with the fish ranks so you stand in 2X water instead of widening a 1× pond.
A — Cast distance
Cast distance is how far the line leaves the island. Early docks do not need it. Reef shelves, lava rocks, and ice edges do. If the 2X stamp or a gold flash sits past your current throw, this node is the unlock, not a fish-species buy.
It stays A because walking closer is sometimes free. Movement speed (B) can substitute on compact islands. Buy cast distance when the geometry of the map is the wall — long water, no path — and you already own enough backpack to justify the walk back to the barrel.
A — Magnets
Magnets pull dropped fish, coins, and deliveries toward you so the pack fills without a scavenger hunt. Demo players who bought “magnet suck up” and “coin suckup range” stopped losing hauls in the grass. On ice, magnets also interact with the clutter of gold piles and penguin minigame coins, which is quality of life rather than a new cash species.
Magnets are A once S-tier capacity exists. On a two-slot pack they save a few steps and nothing else. After extra rods, a magnet is how you actually collect the mess those rods create. If a yellow crate is inbound, a magnet is how you absorb the dump instead of watching it bounce into the water.
A — Sell-value nodes (after the pack fills fast)
Value nodes make every catch louder. They are bait for players who still cannot fill the pack. The correct time is after backpack, bobber stack, and extra rods have turned a visit to the water into a full dump at the barrel. Then each percent of sell-value multiplies a haul that already happens.
Buy them too early and you will screenshot a big dollar on one clownfish and still be broke, because you caught two fish and walked home. Buy them on time and even pond fish — S as volume on the fish list — print like premiums. Lava and 2X water make the same node feel stronger without changing its letter.
B — Movement speed
Speed is comfort. It shortens the barrel run, the walk to 2X water, and the panic when the pack is full. It does not catch more fish per cast. On compact starter islands it is a luxury. On lava and reef shelves it is how you finish the day before you get bored.
Leave it in B. If the walkthrough just opened a sprawling island and you already own S-tier capacity, a speed node is a fair pickup. If you are still choking the pack at 12/40, spend on backpack instead.
B — Fish density
Density nodes put more bodies in the water. They help when schools are thin, and they make max-fish-per-bobber actually find ten targets. They are B because empty-looking water is often a lure-range or island-progress problem, not a missing density buy. Fill the pack first; then, if the water still looks sparse after the walkthrough says you belong here, take density.
B — Extra fishermen (passive)
Hired anglers sit on the island and catch in the background, including clownfish once that species is unlocked. They do not replace your bobber stack. They nibble while you sell, pet the turtle, or throw a penguin.
Keep them B. They are the right buy when your hands are already busy dumping a full pack and you want the idle line to keep moving. They are the wrong buy when you still have one rod and a two-slot backpack. Passive catch cannot fix a capacity bottleneck.
C — Novelty, late dump nodes, and the zoom joke
Late branches include nodes that exist to be clicked: extra zoom on the tree, gag powers, and dump stats that only make sense after every S and A node is already green. The unlimited skill-tree zoom is the honest C example — it is not a power. It lets you admire the web. It does not catch fish.
Spend here when the run is already printing billions and you are collecting achievements or clearing the map for fun. Do not spend here to “fix” a slow island. If a node’s tooltip does not mention backpack, hooks, rods, range, magnets, or value, assume C until proven otherwise.
Yellow delivery crates — use, then reset on NG+
Yellow crates land on the grass (visible in the tropical multi-rod screenshot and the late $34T chaos). Reviewers call them overpowered once the delivery rate climbs. They are not a skill-tree node you toggle; they are a reward stream that can outpace honest fishing.
Rank: use them. Stand near the drop, let magnets help, and sell. Then respec your expectations on New Game Plus instead of rebuilding this entire S–C table around crates. A crate streak does not make backpack size stop being S, and it does not make the turtle a sell-fish. It just means one run went loud. The review is the right place for that argument; this list keeps crates in a sidebar so they do not swallow the tree.
Leave the tree, then fish
Press Space or click GO FISH! when you are done buying. Hovering the $2.5B bobber node is not progress. The upgrade planner exists so the next visit is a shopping list, not a wander. Specs sit on system requirements. Demo pacing — including early backpack and clownfish — is archived under the demo page; the letters on this page follow the 27 August 2026 launch tree.
If a node fights you, ask which pain you felt: full pack, empty hooks, short throw, slow sell, or boredom. Buy S for the first two, A for the next two, B for boredom, C for jokes. Then go fish.
Frequently Asked Questions
Quick answers on islands, upgrades, the turtle, and launch week.
What should I buy first on the skill tree?
Backpack size, then max fish per bobber, then extra rods. You cannot earn if the pack is full, and extra lines waste casts if each bobber still holds one fish. The upgrade planner follows that order.
When do sell-value nodes become worth buying?
After you can fill the backpack in a few casts. Value on a two-slot pack is a screenshot, not income. Once S-tier capacity is up, sell-value multiplies the haul you already make — see how to make money fast.
Are extra fishermen worth it?
They are B. Passive anglers nibble, including clownfish, while you sell. They do not replace bobber stack or backpack. Buy them when your hands are already busy, not when you still have one rod.
What is the unlimited skill-tree zoom node?
A C-tier joke, not a power. It lets you pan around the blue tree. It does not catch fish, raise backpack size, or change the Fish Tier List.
How expensive does Max Fish Per Bobber get?
Late tree still shows it at 10 with the next rank costing $2.5B for +5 while you hold $124.13B. The role stays S: every extra fish on the hook multiplies every rod you own.
How do I leave the tree after buying nodes?
Press Space or click GO FISH! That starts the next island day. Hovering a $2.5B tooltip is not a buy — confirm the node, then get back in the water.