
Getting Started in Just Keep Fishing
First casts, first barrel, first backpack upgrade, and the logs that unlock island two.
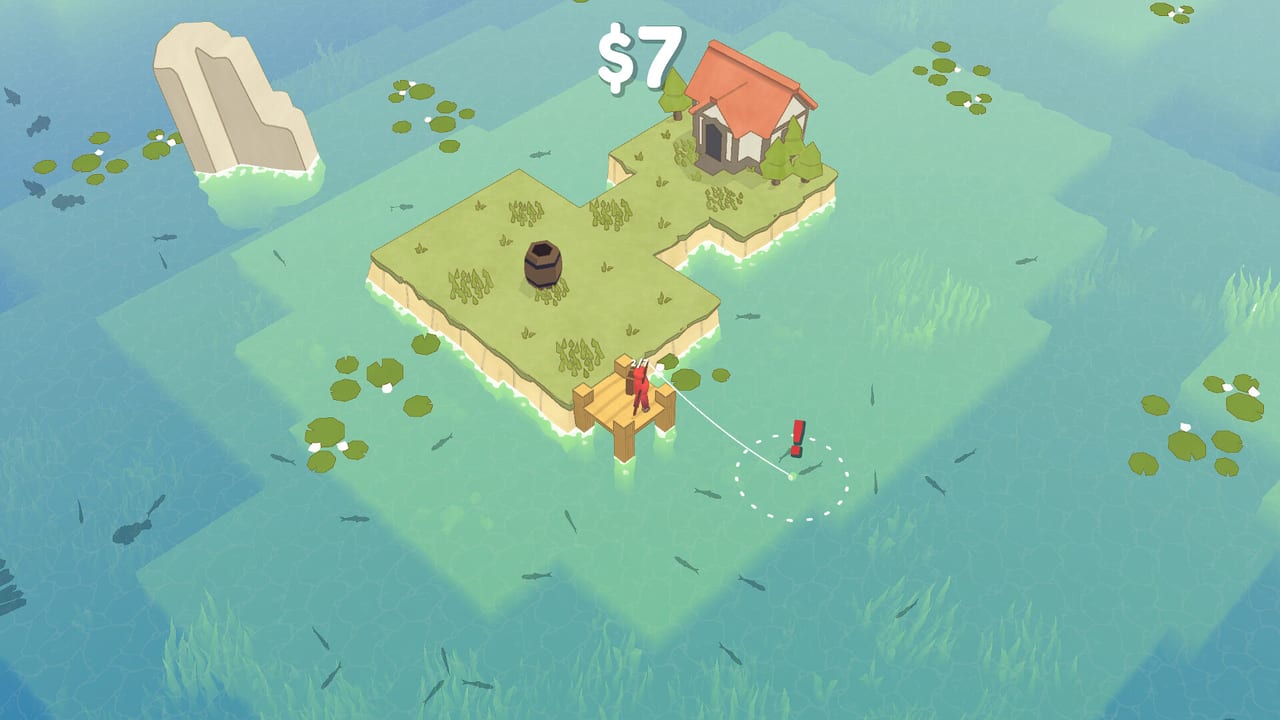
Just Keep Fishing is already out on Steam as of 27 August 2026. You play a red fox in a cute low-poly, top-down world: walk an island, put a line in the water, fill a tiny backpack, sell at a barrel, buy a node on the skill tree, then do it again with slightly better numbers. This page is the first hour only. For the key list, open Controls. For the full biome order, use the Island Walkthrough. For spend order after the first upgrades, jump to How to Make Money Fast and the upgrades tier list.
The loop in one minute
You spawn on a tropical pond island with a hut, a barrel, and a coin HUD at the top of the screen. WASD walks. The mouse aims a cast. Fish that enter the dashed circle around the bobber can bite; a bite shows as a red exclamation on the float. Click to catch. Caught fish sit in your backpack. Walk to the barrel and press E to sell. Coins buy nodes on a blue skill-tree map. Space (the GO FISH! prompt) drops you back onto the island. That is the entire verb set for hour one. Everything else — extra lines, magnets, extra fishermen, lava, 2X water, space islands — is the same loop with a larger bag and a louder HUD.
Tutorial prompts and your first casts
The game teaches by overlay, not by a lecture. Follow the first prompts in order: move, face the water, cast, wait, click the bite, walk back. Do not sprint past the dashed circle. Early fish are small tropicals; the HUD may sit near $7 a sale. That is normal. The fox is slow, the bag is tiny, and the water is a pond, not an ocean. Cast close until you buy distance. If a cast lands outside the school, wait or recast rather than wandering the whole coastline. The hut is landmark, not a second shop.
Hold the cast when you want more distance — the demo taught that as a longer press, and the launch build still rewards aiming past your feet. You do not need max range on island one. You need reliable bites inside the circle. Missed clicks happen; the fish does not vanish forever. Recast and watch the bobber, not the coin counter.
Barrel, hut, and selling with E
Every island you will see in the first hour has a barrel. That barrel is the shop sink. Carry fish there and press E. Do not stand in the water hoping coins appear; the backpack is the inventory, the barrel is the till. The hut is scenery and a spawn landmark so you can find the barrel after a long walk. If E does nothing, you are not close enough or the bag is empty. Fill, walk, sell, repeat. This is also why backpack size is the first real purchase: a two-slot bag means you live on that path.
Yellow delivery crates sit on islands later and reviewers say those deliveries become overpowered fast. On hour one you may not have them yet. If you see a crate, interact with it the same way you interact with the barrel — walk up, use E, take the payout — then go back to fishing. Do not ignore the crate, and do not skip bag size because a crate paid for one node.
First backpack upgrade: two, then five
The backpack starts tiny. A typical first purchase takes you from 2 slots to 5. That single node changes the hour more than cast distance. Five fish per trip means fewer walks, more time with bobbers in the water, and enough coins to look at a second node without going broke. Buy it as soon as the tree offers it. Screenshots later in a run show 12/40, 0/137, 66/350, and 30/950; those numbers are the same upgrade line, not a different bag. You will not see 950 in hour one. You should see 5.
Sell before you open the tree if the bag is full. A full bag while you browse nodes is wasted bite time. The skill tree does not catch fish for you until you buy extra fishermen, and those nodes are not the first-hour pick.
When to open the skill tree
Open the tree after the first two or three barrel sales, not after one lucky catch. You want enough coins to buy backpack size without staring at a locked cluster. The map is a blue node graph. Mouse-wheel zoom is unlimited — the developers left that in as a joke — so if the camera swallows the island, scroll back. Space / GO FISH! returns you to fishing. Do not live in the tree. Buy one node, go fish, sell, buy the next.
Sensible first-hour nodes, in order:
- Backpack size (2 → 5, then whatever the next cheap capacity step is).
- A little lure / attraction range so the dashed circle actually finds fish.
- Cast distance only if you are physically missing schools from the bank.
- A second rod or extra line once selling no longer feels like a chore.
Leave sell-value, extra fishermen, fish density, magnets, movement speed, and the late max-fish-per-bobber line (screenshots show Currently: 10, next +5 for $2.5B) for after island two. Those nodes are real; they are not hour-one prices. Use the upgrade planner if you want a spreadsheet view of that order, and keep Guides Hub bookmarked for the rest of the how-tos.
Logs, the boat, and island two
Island one is a tropical pond. Somewhere on it you will start seeing wood / logs. Those are the boat resource. You do not need a fishing quota at the top of the screen in the sense of a raid timer; you need enough logs and enough coins that leaving does not feel like a wipe. When the boat is ready, take it. Upgrades persist. The fox, the bag, and the tree come with you. Island two is a new layout, not a reset.
A turtle already swims around island 1. You will not catch it in the first hour in any reliable way. Leave it. The catch, the pet that walks the island, and the Just Keep Hopping achievement are a later job — that is the turtle guide, not this page. Clownfish can be worth more than the small tropicals (they were the demo’s obvious upgrade catch). Grab them when they enter the circle; do not camp one tile of water waiting for a golden fish. Goldens are a coin multiplier and they show up when the tree and the island allow them, not because you stared harder.
What to ignore until the first boat ride is done
Do not hunt every Steam achievement on island one. Hooked and the other early names will happen while you play; Pocket Change and Small Fry are not a reason to idle. Do not wait for codes; there are none. Do not farm for a $251K HUD on the starter pond. Mid-run dumps at $248–$251K, lava figures like $11.41M, and late $99.24B / $124.13B / $34.21T readouts are upgrade scaling after several islands, extra lines, and a bag measured in hundreds.
When the first boat ride is done, switch from this page to the Island Walkthrough so ice, penguins, lava, 2X reefs, and later interstellar stages have a route. If money stalls, use How to Make Money Fast. If a key feels wrong, confirm it in Controls rather than assuming a controller layout. The Tier List Hub and Tools exist for ranking and planning once the first-hour decisions are over.
Frequently Asked Questions
Quick answers on islands, upgrades, the turtle, and launch week.
What should I buy first?
Backpack size. The starter bag is tiny (2, then 5). Capacity cuts walks to the barrel and funds the next node. Cast distance is second unless you cannot reach any fish.
When do I open the skill tree?
After a couple of barrel sales, buy one cheap node, then press Space / GO FISH! and return to the water. Do not browse the whole blue map on an empty wallet.
How do I reach the next island?
Collect wood / logs for the boat on the current island, then sail. Upgrades persist. Details for each biome sit in the Island Walkthrough.
Can I catch the turtle on island one?
You will see it swimming. Catching it, keeping it as a walking pet, and unlocking Just Keep Hopping are later. See How to Catch the Turtle.
Does the demo match this first hour?
The 10 June 2026 demo used the same loop and ended after a few islands. The 27 August 2026 launch continues that loop through lava, 2X water, and later space stages.