
Just Keep Fishing Coin Spend Order Planner
A static priority list for backpack, bobbers, rods, range, magnets, and comfort — not a live calculator.
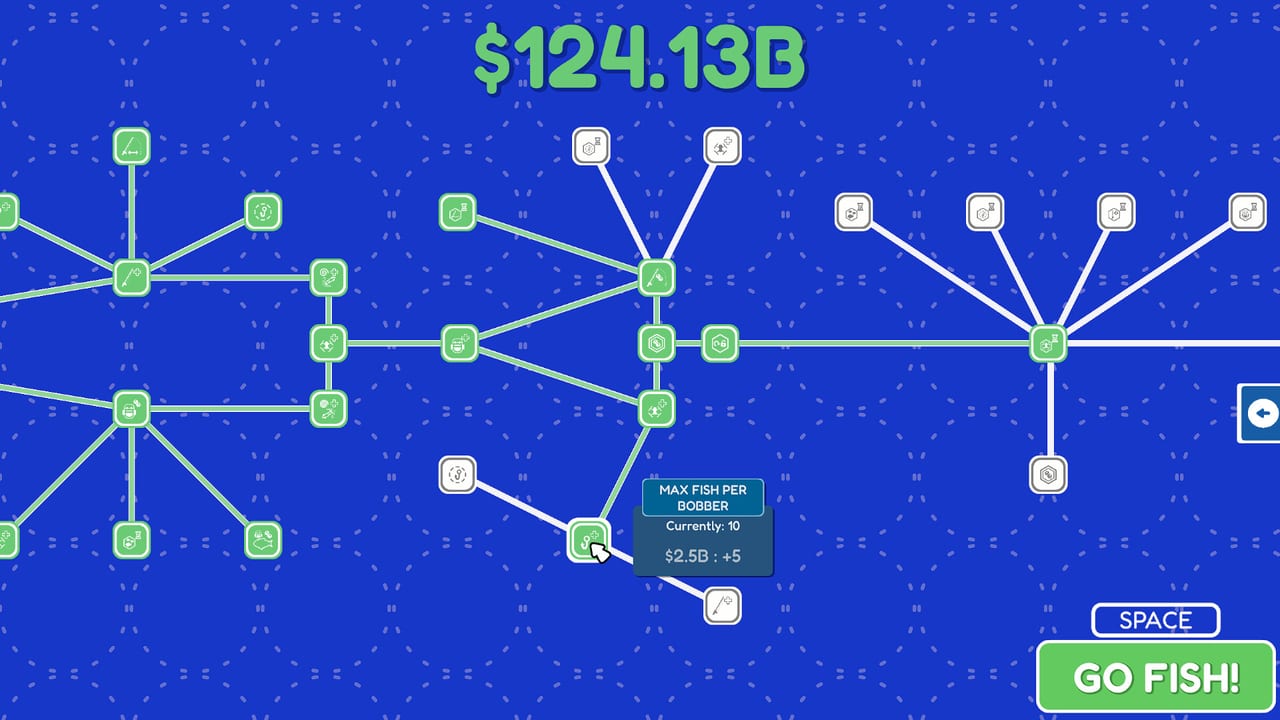
This page is a static planner. It does not read your save, it does not run a formula in the browser, and it will not tell you the exact coin total in your pocket. It tells you the spend order that keeps Just Keep Fishing’s loop moving after the 27 Aug 2026 launch. If you want a ranking of how good each node is in a vacuum, use the upgrade tier list. If you want more coins before you shop, use how to make money fast. Come here when the shop is open and you are about to buy the wrong thing.
The loop is tiny on purpose. You press Space for GO FISH!, bobbers hit the water, fish land in the backpack, you walk to the barrel, coins spit out, you buy a rank, you cast again. Every bad purchase is a delay in that loop. Early coins are scarce enough that one vanity rank can stall the next island. Late coins look infinite until a single node asks for $2.5B while you are holding $124B. The order below is how you spend without feeding the stall.
Recommended spend order
- Backpack until you stop walking to the barrel every two fish.
- Max fish per bobber so each bite pays for the walk.
- Extra rods so more lines are in the water at once.
- Cast distance + lure range so those bobbers actually find fish instead of empty water.
- Magnets / sell value once the catch rate is already high.
- Movement speed / fishermen as comfort, not as the engine.
- Do not dump first cash into vanity. Looks are a late dump, never a first dump.
Priority table
| Priority | Node | Why | When to stop |
|---|---|---|---|
| 1 | Backpack capacity | The loop dies if you walk to the barrel after every two fish | Stop when a full haul no longer forces a dump after one or two bites |
| 2 | Fish per bobber | Multiplies each successful bite before you pay for extra rods | Park it when the next +5 costs billions and rods or range are starving |
| 3 | Extra rods | Parallel casts raise catch rate without extra walking | Stop when extra lines sit idle because the water in range is empty |
| 4 | Cast distance + lure range | Bobbers that land in empty water catch nothing | Stop when casts consistently hit fish clusters, not shoreline grass |
| 5 | Magnets / sell value | Multiplies a high catch rate; wasted if you barely catch | Buy after the catch engine is online, not instead of it |
| 6 | Movement speed / fishermen | Comfort between barrel trips, not the money engine | After backpack, bobbers, rods, and range are doing their jobs |
| 7 | Vanity / cosmetics | Looks | Never spend first cash here; wait until the engine is bored |
1. Backpack until the walk is rare
You start with a tiny pack. Two fish, walk, sell, two fish, walk, sell. That commute is the real early tax. Backpack ranks are the only nodes that delete commutes. Buy them until a cast cycle can fill the pack without feeling like a fetch quest. In the demo and the full game, the first backpack bumps (two to five, then higher) are the cheapest way to make Space / GO FISH! feel like a loop instead of a chore.
Stop buying backpack the moment a haul lasts long enough that you are choosing when to sell, not being forced to sell. Extra pack after that is still fine, but it should lose to fish-per-bobber if those two sit in the shop together. The getting started page covers the first barrel trip if you have not done it yet.
2. Max fish per bobber
Once you can carry a real haul, each bite has to be worth the pack space. Fish per bobber is the multiplier on the action you already take. It is usually a better buy than a third rod while you still have one line that barely feeds the barrel. Push this node hard in the middle of an island, then check the shop again.
The late curve is not subtle. A listed bump is +5 fish per bobber for $2.5B when your wallet can already show $124B. That is exponential cost, not a misprint. Buy it if catch rate is still the bottleneck. Skip it if your bobbers miss the fish entirely — that is a range problem, not a per-bobber problem. Do not treat $2.5B as a vanity flex. Treat it as the price of one more multiplier on a loop that already works.
3. Extra rods
Extra rods are parallel casts. They shine after each line already pulls a useful stack and the pack can hold the result. Buying a second or third rod while the pack dumps every two fish just creates more walking. Buying extra rods while bobbers land on dry sand just creates more empty animation.
When extra lines sit in the water and still catch, keep buying. When extra lines sit in the water and stare at empty tiles, stop and fund cast distance plus lure range instead. Rods are a throughput node. They need a target.
4. Cast distance and lure range
This pair is the “bobbers actually find fish” pair. Distance puts the line where the school is. Lure range lets the bobber claim fish that are near the landing, not only the pixel it hit. Together they convert rods and per-bobber ranks into real catches. Apart, they look like dump stats.
Buy them as a pair when you can see fish you cannot reach, or when you can reach water that never bites. Do not buy a huge distance dump while lure range is still tiny; you will land past the school and still miss. Do not max lure range on a dock you already saturate. The walkthrough notes when new water opens; this planner only cares that your current water is hittable.
5. Magnets and sell value
Magnets and sell value multiply a haul you already catch. They are terrible first buys because a 20% better sale on two fish is still two fish. They are excellent once backpack, per-bobber, rods, and range are humming, because then every barrel trip is a stack. Wait until you feel the catch rate is high, then dump into value.
If coins stall after a value dump, you bought too early. Go back to how to make money fast and rebuild throughput. If coins explode after a value dump, stay on this row until the next island asks for a new commute or a new range.
6. Movement speed and fishermen as comfort
Movement speed shortens the barrel walk you already reduced with backpack. Extra fishermen add busy water and a livelier dock. Both are comfort. Comfort is allowed. Comfort is not a substitute for the engine. Buy speed when you are already rich and the walk still annoys you. Buy fishermen when you want the island to feel less empty. Do not buy either while you still dump the pack after two fish.
7. Vanity last
Vanity nodes, hats, joke cosmetics, and anything that does not change catch rate, pack size, range, or sale value are last. First cash into vanity is how a short incremental turns into a stalled screenshot. The game is already silly. You do not need a cosmetic to prove it. Spend on the turtle route, the next island, or the next +5 fish instead. Cosmetics can wait until the shop is printing numbers that no longer feel like decisions.
How to use this with the rest of the wiki
- New file: getting started, then this planner on the first shop visit.
- Stuck on coins: how to make money fast, then return and buy the next row in the table.
- Two nodes cost the same: upgrade tier list as a tie-break, still respecting this order.
- Chasing a species: fish tier list after range can actually reach it.
- Turtle: how to catch the turtle after the engine exists.
- Specs before a session: system requirements.
- Controls if Space / GO FISH! is not landing: controls.
This planner will not update itself when a later patch retunes a price. If Set Sail changes a node, check the Updates Hub and then edit your own habit, not a phantom spreadsheet. Until then, the table is the spend order for the 27 Aug 2026 shop.
When the shop shows $2.5B for five more fish on a bobber and your wallet reads $124B, that is not a glitch. That is the late curve. Buy it only if catch rate is still the bottleneck. Hats can wait until the turtle is a memory.
Frequently Asked Questions
Quick answers on islands, upgrades, the turtle, and launch week.
Is this an interactive upgrade calculator?
No. It is a static spend-order sheet. It will not ingest your coin total or output a shopping list from a save file.
Why is backpack first instead of extra rods?
Extra rods while the pack dumps every two fish only create more walking. Backpack deletes commutes. Rods need a pack that can hold the extra fish.
When should I buy the $2.5B fish-per-bobber rank?
When you already have about $124B and catch rate is still the bottleneck. If bobbers miss fish, buy range first. If you walk after every bite, buy backpack first.
Are magnets a good first purchase?
No. Magnets and sell value multiply a haul you already catch. Buy them after backpack, fish per bobber, rods, and range are online.
Where do vanity upgrades belong?
Last. First cash into vanity stalls islands. Spend on the engine, then the turtle, then cosmetics when the shop no longer feels like a decision.
How does this relate to the upgrade tier list?
This page is *order*. The upgrade tier list is *quality*. Use the tier list to break ties, not to skip backpack in hour one.