
Just Keep Fishing How to Make Money Fast
Backpack first, then rods, magnets, 2X water, and yellow crates. Never idle on a full pack.
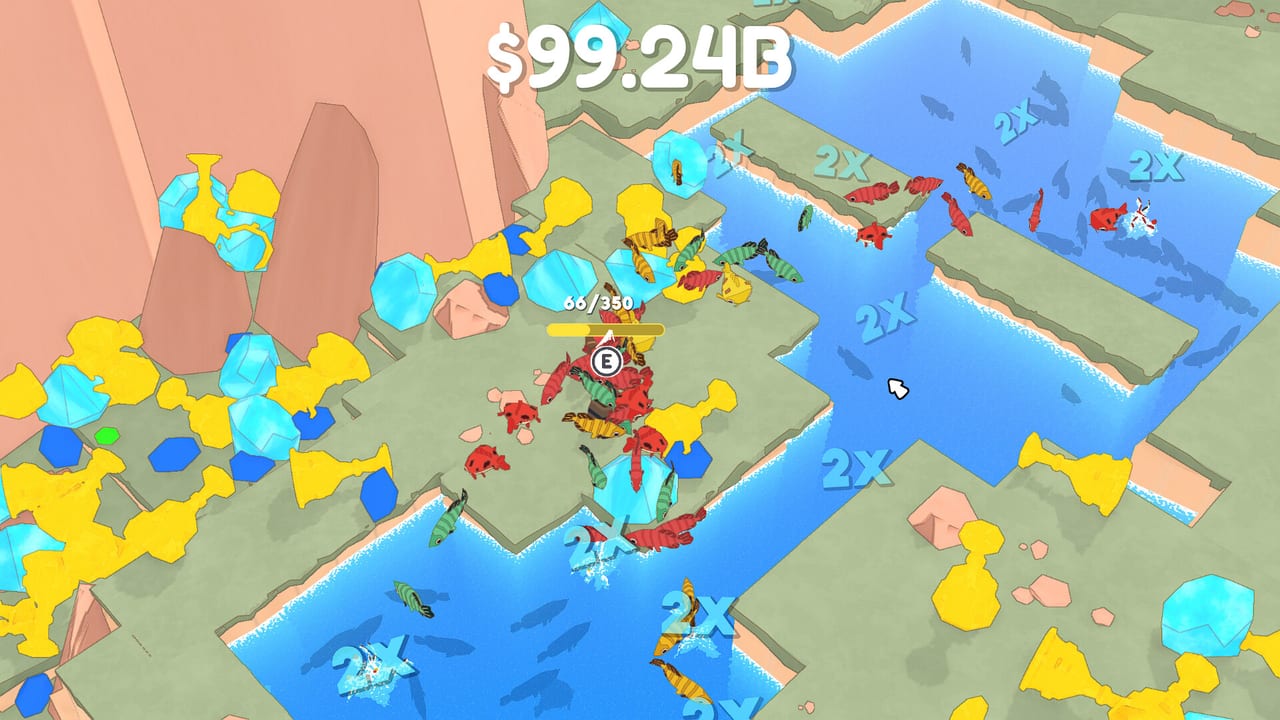
Just Keep Fishing prints coins from a tiny loop: catch fish, store them in the backpack, walk to the barrel, and sell with E. The fox does not need a better joke than that. The skill tree (Space or GO FISH!) turns the same loop into millions, then billions, then the kind of HUD that looks broken on purpose. This page is the cash route from the first dock to that late chaos, without pretending we have a hidden drop table.
If you are still learning the buttons, read getting started and controls first. If you want a ranked spend order after you have coins, use the upgrade planner and the upgrade tier list. Species value lives on the fish tier list.
The loop that actually pays
Every faster strategy is a way to run catch → backpack → barrel more often, or to make each dump worth more. Early on the bottleneck is pack size. You catch two or three fish, the backpack is full, and if you keep standing in the water you are wasting casts. Walk to the barrel. Sell. Buy the first backpack bump. It is cheap and it is the highest-value early spend in the game because it lets the fox keep fishing.
Value is not just size. In the demo, clownfish were worth more than they looked. Golden fish apply a coin multiplier; always reel those. Do not invent exact prices here. Watch the dump number after each barrel and spend on whatever removes the current bottleneck: space, fish per bobber, or extra rods.
Early game: buy space, then bites
The first island is a teaching shore. Cast, fill, dump, repeat. The turtle will swim past and refuse the hook; that is a turtle problem, not a money problem. Your job is to stop the full-backpack freeze.
Spend order that holds up in play:
- Backpack size until you can take a full bobber load without walking after every fish.
- Max fish per bobber so each cast is a cluster, not a single nibble.
- Extra rods when they appear. Multiple rods explode income because they duplicate the whole loop.
- Magnets once fish start landing off the path to the barrel. A magnet that sucks stragglers saves more time than a tiny sell-percent node.
Range upgrades help you hit farther schools, but they lose to backpack and extra rods while the pack is still tiny. If a node only makes the fox look busier without raising dump size, skip it until the barrel is spitting a number you can feel.
Mid game: 2X water, crates, and air traffic
Mid-game is when the HUD starts using labels instead of pocket change. 2X water is the obvious multiplier: fish the marked water, not the pretty water. If a pool is tagged 2X, that is your station until the backpack is full, then you dump and return. Do not camp a weak cove because the turtle is swimming there.
Yellow delivery crates show up as a second income lane. You are still fishing, but crates turn specific catches into extra payouts. Later in a run, deliveries become extremely strong. One launch-week reviewer called them overpowered and wanted a rebalance. Play them; just know they can dwarf barrel dumps once they are online.
This is also when drones and planes start crossing the sky. They are mid-game spectacle and another reason to keep moving. A full backpack plus a crate sitting on the dock is wasted time. The fox should be walking, dumping, and recasting, not watching the water like a screensaver.
Penguins belong to the ice biome. Throwing them is a demo toy. Penguin Kicker is a timed minigame with a chest and coins, which is a burst of cash rather than a replacement for the barrel. A reviewer even saw a penguin steal a large diamond. Fun, not a farming route. Keep the turtle pet if you have it, but do not wait for it to pick up coins; that extra utility is still speculative.
Late game: millions to trillions
Late HUD snapshots from real sessions look like this:
- About $11.41M while lava fishing.
- About $99.24B with 2X water labels on the pool.
- About $124.13B sitting on the skill tree screen.
- About $34.21T in the chaotic end stretch, with 3x / 6x / 9x multiplier bars and a backpack reading 30/950.
Those are observations, not a shopping list. The lesson is the shape: multipliers stack, backpack capacity becomes huge, and standing still is the only way to fall behind. Lava fishing is a late spectacle that still uses the same dump. 2X water still beats unmarked water. Extra rods still multiply whatever the pool is worth.
The second-playthrough complaint is real. Once you know the spend order, the early islands feel already maxed and the ramp can feel off. That is a design note, not a reason to skip backpack upgrades. The first run is where the money guide matters. The second run is where you skip the cute mistakes and go straight to rods, magnets, and crates.
What to buy, and what to ignore
Use the upgrade planner when several nodes are affordable at once. As a rule of thumb from play, not from a hidden table:
- Backpack is first until dumps stop interrupting every cast.
- Fish-per-bobber and extra rods are the explosion.
- Magnets are quality of life that becomes speed once the ground is covered in fish.
- 2X water is a location choice as much as a purchase: stand in the labeled pool.
- Sell-value nodes are fine after the loop is fast. They do not help if you cannot carry the fish.
- Turtle-related hopes are not a strategy. Catch the pet, then ignore it for income.
Do not stand still when the backpack is full. That sentence is the whole mid-game. Walk, press E, recast. If a magnet is inbound, keep fishing while it drops. If a crate is ready, turn it in, then fill the pack again.
A session plan you can copy
Open on the starter dock. Fill the tiny pack. Sell. Buy backpack. Repeat until a second rod or a higher bobber cap appears, then buy that. When 2X water labels show, move. When yellow crates show, treat them as a co-equal dump. When lava or ice biomes open, fish the new pool because the new fish and the new multipliers pay more than nostalgia for the first cove.
If you want the island order around those biomes, use the walkthrough. If you want to know whether the two-hour ramp is “worth” the price, that is the review. If you are only here to make the HUD say a stupid number, stay on this page, keep the pack moving, and just keep fishing.
Frequently Asked Questions
Quick answers on islands, upgrades, the turtle, and launch week.
What should I buy first?
The first backpack upgrade. It is cheap and it stops the full-pack freeze. Then raise max fish per bobber and extra rods. Use the upgrade planner when several nodes are on screen at once.
What does a golden fish do?
Golden fish apply a coin multiplier. Reel them whenever they show. This wiki does not publish made-up sell prices; watch the barrel dump after each gold and keep fishing the 2X water if it is labeled.
Why are yellow delivery crates such a big deal?
They add a second payout on top of the barrel. Later in a run they become extremely strong. One launch-week reviewer said deliveries need a rebalance. Play them, but do not ignore backpack and rods while you wait on crates.
Should I stand still and idle?
No. This loop is active. A full backpack earns nothing until you sell with E. Magnets, extra rods, and 2X water all assume the fox is moving.
Does the turtle help me make money?
Not in a way you should plan around. Developers have talked about coin pickup and skill-tree help. Until that is in a live build, treat the pet as a mascot and follow how to catch the turtle only for the companion itself.